Showing posts with label tutorial. Show all posts

Thursday, February 27, 2014

Lego Pillows....


today I have an easy project that the Lego lover in your house is going to love. My kids are loving me for these pillows and my daughter carries the pillow everywhere and refuses to sleep on anything else.

 This is what you are going to need:


  •  Avery  Transfer-on paper for dark fabrics
  • normal printer paper to use to cut out clothes patterns
  • fabric for the pillows and knit fabric for the clothes
  • x-acto knife(or any tool) to cut out the transfer paper  
  • and last but not least a sewing machine and iron

You are welcome to use the mario Lego man and girl that I created with a combination of these decals , picmonkey and adobe photoshop elements 10. I then enlarged them by using Blockposters ( I wished I discovered this site sooner and would have saved me a lot of moving of paper on copier and paper with past projects.

These ones you are going to use to print with the Avery Transfer on(your are going to need to pieces of paper for every figure you want to print out.


This is how it looks after you cut it out with the x-acto knife


and These two you are going to print on plain printer paper and use to cut the right size clothes:


I can draw the clothes on. My son wanted a Mario so I just drew Mario clothes and my daughter wanted pink and a heart so you can do whatever the kid/s likes.


before I cut the clothes from the knit fabric I ironed on wonder-under by Pellon which makes it easier to cut and also iron  onto your Lego figure.


After you cut your pillow( I just cut 2 rectangles to make a standard pillow case) you are going to iron on your Lego figure by first taking off the backing and then iron on the feet and the the top side of the body as per instructions on the package. Make sure you use the wax paper on top off your figure at all times when ironing......


there was watermarks on mine after I ironed it but disappeared after it cooled down.

Now you are going to add your clothes, iron it on , top stitch  
and then assemble your pillow.
this is how it looked after pinning the front and back panel together...


and for now I am the kids' Hero!


I just started a Facebook page to let you know what I am up to, kids craft ideas, craft and sewing products that I like, Tutorials I've tried etc. Like me 


linked up BWS tips button
featured on:

Tuesday, July 9, 2013

How I flipped the "Roller skate Dress"

 
this post is accompanying my original picture post of my flip of Oliver + S Roller skate dress. Go check it out HERE
If you want to buy the pattern go HERE
If you want to look at all the sew along creations go HERE
 
 
Here follows a picture tutorial of the flip.


And there you have it. This is a nice addition to our Sunday/Party dresses.


Wednesday, June 19, 2013

something to keep little hands busy.......


I always enjoy making crafts that the kids can help me with. Isabella likes to sort things and I have bought toys like that before but we keep on losing the pegs because it is removable. I made one that is glued and thus she can not remove them :)
My plan was to use foam sheets but I could not get them through my punches so I made a plan to use felt ( It worked out great because now we can use them on our felt boards to make flowers)
 
This is what you are going to need. I did not need to buy anything and had it all on hand.
For the shapes I used my handy dandy Go! Baby which is one of my favorite tools for crafting,sewing etc. It was a to Mom from Mom Christmas present.
You can just cut it out by hand and make other shapes like triangles,squares,rectangles, circles etc.


cut your fabrics like described below.

 
I first mod podged fabrics on my square as well as the shapes of fabric. I also painted the pegs the same color as the matching fabric at the bottom while the mod podge was drying. Drill your holes and glue the pegs in it. She already tried to pull them out but have not succeeded. HA HA!


while I was assembling the pegs the kids had the best time making flowers on their felt board. They used the already cut out shapes and I also made some stems and leaves for them.
This is something we can take with to restaurants to keep them busy.


Look how pretty. Arthur did a great job assembling flowers


Isabella likes it small and simple.


This is standing in the living room on the coffeetable .


Till next time......

Saturday, June 8, 2013

Traveling Game Pouch tutorial

Arthur used to have a game bag but it got lost at a hotel last year. It is a pain to keep all the original boxes and to be honest I am tired of hearing " Mamma, where is my ...... game?" And the last thing mamma has time for is going on a 3ds game hunt.  Here is a tutorial on how to make a game pouch for 3ds games and you can adjust it to how many games and how big you want it. I wish I added a place for the system itself because mine ended up being the perfect size. I hang it up in his room close to his bed so it is easily reachable to him but not to his sister and if you fold it over he can carry it with him if we go to a restaurant.


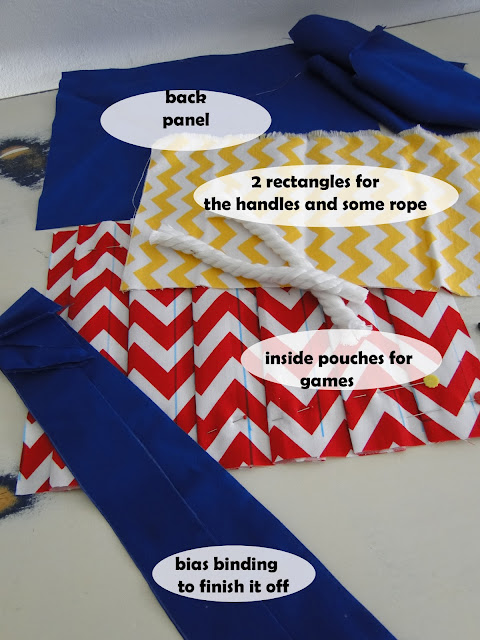
This is what you are going to need:
You are also going to need interfacing for both the inside and outside panels. the chevron part I used an iron on thin interfacing and ironed it on before folding the pouches. This makes it a little thicker and helps so the games stay in place and don't slip out.
For the outer panel I use a STRONG woven sew- in interfacing to keep the form.


Drawing lines.
You are going to draw 4 lines that are 1 1/4 inches apart and the fifth one is 1/2 inch then repeat. I repeated this 5 more times for 6 rows.
 
 
After you folded your pouches and ironed them very well you are going to mark your lines to create the pockets.


You can make the handles how ever you want. I added rope so it creates more grip.


Attach your handles to the outer panel with the woven interfacing and sew on.


 Now you are going to put the outer and inner panel together (wrong sides) and pin your bias binding on.


Finished product. You can hang it up closed and slip the handheld in it to keep everything together or open
 

Wednesday, May 29, 2013

Let's call it "Independence"

I knew I had to have Isabella's 4th of July outfit somewhere in my schedule in the next couple of weeks. When I heard it was skirtweek I knew today was the day that I was gonna tackle that project. To celebrate Independence day and also the fact that this is a big year for Miss Bella's independence ( or so she thinks) I wanted to do something that she can be active in just like she likes to be but also still something feminine just like her.


I used New look 0176 as my base pattern. I wanted to do 2 layers with the top layer being 3 pieces of  fabric blossoming down. I decided I am first going to sew the layers together and then cut the pattern after I assembled my 3 pieces.
 
 
Here are the ingredients:
These are all different fabrics from my stash. I love the top fabric for 4th of July because it makes me think of the fireworks.


I first cut out the bottom layer of the skirt by using the pattern piece to cut 2 panels on the fold.
The length of the skirt was 12 inches so I  cut 3 strips that was 4 and a 1/4 of an inch wide. I also cut the band with the top fabric that I was going to use.


I first just sewed two skirt panels together just on the one side. serged and folded my bottom seam over and marked where I was going to add my net ruffle.(one inch from the bottom)


for the strips of fabric I serged at both top and bottom and then made two rows of wide stitching like when one does a ruffle.I pulled the bottom threads to create a bit of a ruffle on the middle and bottom strips.

Picture below is of the fabric on the wrong side. I attached the two fabrics by overlapping them. I used my ruffle bottom stitch as a guide of where to pin the fabric. I did this with all of the strips so that the fabric looks like 3 ruffles sewn together.


Next was the net part of the skirt that I wanted to add to the bottom layer. I love that you can buy the net on a roll and then you do now have to cut it yourself. I folded the strip of net in half and make my stitch on the fold. If you use an universal needle and a 4 setting(stitch length) you can just sew and it will pile your net neatly like shown below. I used dark thread to make it easier to line it up with my white chalk mark I had marked on my red bottom layer earlier.

 
Here is the red net all gathered and lined up on my white mark on the bottom layer of the skirt.


Next I am going to cut my top layer of the skirt. I also gathered top layer so that it makes a natural curve along the top line of the pattern.


sew the sides together and make sure your pieces line up like below.
SIDE SEAMS of top layer.

after the top layer is sewn together. I sewed the other side of my bottom layer  with the net attached all the way around. After that sew the bottom seam of the bottom layer.

 
Here are the two layers.

 
You are going to pull the top layer over the bottom and make sure the top of both layers line up and pin them together.


This is the band for the elastic. sew the ends together and leave a part open where you can thread the elastic.
 
fold the band double and  pin to the right side of the 2 layers.

 
sew it together and serge.
 

I folded the serged part on the inside up and gave it a topstitch through the top side of the band.
Here is the skirt almost done. All it needs now is the elastic. Measure the elastic around your childs waist so that is semi tight.
Thread through the band.
pin it together and sew through it a few times.
After I put in the elastic I also made a topstitch over the top of the band through the elastic so that it keeps flat and doesn't bundle .


And there you have it. A happy girl with a very fun "Independence" skirt.
I am still thinking about what shirt to make but that's next week.